
Ombre 'to create a pattern in colour which is shaded or graduated in tone'


Step 1 - Right, so the first thing you need to do is use your elastic bands to section off each segment of your fabric. This is purely to help you see at what point you need to stop when dipping the fabric in the dye. (We are not going to dip all of the fabric in at the same time, this is how we create the ombre effect). I also found having the elastic bands on created a beautiful white line which helps section off the different shades of colour (just the effect we are looking for!) It is up to you how many sections you would like but I thought 3 bands would be best for this technique, leaving you with a result of 4 different shades.

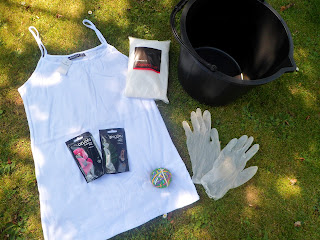
You Will Need:
- Fabric Dye (you can buy this at any home-ware or craft store. I got mine at Wilkinsons and I chose to use 'Dylons' Fabric Dye. I bought two different colours, one in 'Dark Green' and the other in 'Flamingo Pink'. If you know a different dye that you would rather use instead of 'Dylon', then go ahead! Personally I thought this particular product was worth the money and the colours came out strong. Each Dye pouch was £3.99).
- Fabric To Dye On To (for this particular technique I chose to dye on to 3 plain white cotton vest tops. I bought these cheap from a local high street store (Primark) because they were cheap at £1.00 each in the sale! and were perfect for a new experiment. I highly recommend using 100% cotton fabric because having had experience using both natural and synthetic dye's, I have found that the dye absorbs the best on to cotton and doesn't fade as quickly).
- Salt 250g (here you just need the normal table/cooking salt. Make sure to weigh the salt properly to get the best results).
- Hot Water (you will need to make sure you have access to hot water as and when you need it throughout the process, I just made sure I was close to a sink and a tap!).
- Container Or Stainless Steel Sink (you will need to have a fairly deep container to put the dye into, one that wont stain or ruin from the dye. A standard plastic bucket will do just fine and I got mine from a local Hardware store. You might find you already have one hidden away in the shed somewhere. If you cant get one of these then your standard stainless steel sink will do the job just as good).
- Rubber Or Latex Gloves (one of the most important things you will need is a pair of, or probably more than one pair of protective gloves. You don't want to dye your hands green and it is always a good idea to keep your skin away from any sort of chemical substance).
- Elastic Bands (you are going to need 3 or 4 elastic, rubber bands. These are really easy to pick up from any hardware or stationary store and they come in small bags or you can get a round ball of around a hundred bands).
A Round Up Of Your Essentials:

Part One
Step 1 - Begin by hand washing your chosen fabric. I used a small amount of fabric washing detergent that was already at home in the cupboard. You only need a small amount to lather up a soapy mixture with a bucket of water. Your fabric needs to be washed beforehand so that any excess chemicals from the manufacturing process is removed. This
makes it a lot easier for the dye to absorb evenly over the fabric.

- Once you have done this, ring out your fabric and leave it damp.

Step 2 - Using your protective gloves, you now need to fill a separate container with 500ml of hot water and dissolve your home dye in the container, making sure to stir with a stainless steel spoon for around 2 minutes so that all the powder is completely dissolved and doesn't stick to the bottom. For this step I used a standard plastic measuring jug so that I could measure the water before putting in the dye mixture.

Step 3 - Next, you need to fill your container/sink with approximately 6 litres of boiling water. This step is quite simple but you obviously still need to take care when working with and handling containers full of hot water. Always take caution!

Step 4 - Okay, now its time to get out the weighing scales! You need to measure out 250g of salt which you will then add to your container full of boiling water. Pour it in and stir! If you are wondering why the salt needs to be added to the mixture, it is because it helps to fix the dye onto the fabric, leaving you with a much better, less wishy washy result. Of course, this step isn't vital, it just depends on the result you are looking for.

Step 5 - Next, remembering to keep your protective gloves on, you need to take your jug of dye mixture and pour this into your container of salty water. Stir for around 3 - 5 minutes. You now have your final dyeing solution and you are almost ready to start the fun part!

Part Two: Create The Standard Ombre Effect
What will your fabric look like?

Step 1 - Right, so the first thing you need to do is use your elastic bands to section off each segment of your fabric. This is purely to help you see at what point you need to stop when dipping the fabric in the dye. (We are not going to dip all of the fabric in at the same time, this is how we create the ombre effect). I also found having the elastic bands on created a beautiful white line which helps section off the different shades of colour (just the effect we are looking for!) It is up to you how many sections you would like but I thought 3 bands would be best for this technique, leaving you with a result of 4 different shades.

Step 2 - We are now ready to dye the fabric! To create your first and lightest shade, you need to place ALL of your fabric into the dye bath at the same time and leave it to soak for 5 seconds. This will create an all over even colour on your fabric.

Step 3 - Now you are going to create your second shade and to do this you need to dip the fabric in the dye bath but leave your first section of fabric out of the dye, so in my case, I stopped when the dye levelled with the green elastic band which you can see above. Leave the fabric to soak for 10 seconds this time.

Step 4 - To create your third shade of colour, you are going to do the same process again, but leave your first two sections of fabric out of the dye bath. So in my case, I stopped when the dye levelled with the purple elastic band. Leave the fabric to soak for 15 seconds this time.

Step 5 - Okay, to create your fourth and darkest shade of colour, you are going to dip the fabric in again, but leave the first 3 sections of fabric out of the dye. So in my case, I stopped when the dye levelled with the yellow elastic band. Leave the fabric to soak for 20 seconds this time.

Step 6 - Almost done! You have now finished dyeing your fabric so gently squeeze the excess dye from each section and bring the fabric over to a source of clear running water. Leaving the elastic bands on, run the water over the fabric until the water runs clear and there is no more dye to be rung out. (Leaving the elastic bands on means the dye will not run over the white lines that will appear when you take the bands off). Now take the bands off and run the water over the fabric one last time just to be certain it has all come off.

Step 7 - You are finished! All you need to do now is hang your fabric out to dry in the sun (this is what i did but you can always hang it somewhere inside if the weather isn't very nice) I recommend not tumble drying your newly dyed fabric because it may fade slightly.

Would you like to see what mine turned out like? ...
Here it is!

Part 3: Create The Circular Ombre Effect
If you would like to learn how I created the circular ombre effect which you can see in the vest top above, see below.
You Will Need:
- 5 - 6 Circular Objects (these can be objects of your choice which can also differ in size. Marbles work really well for this technique, and you can get them in small bags of 8 - 10. I actually used a selection of stones I found in the garden and these worked just as well. If you do use stones, just remember to give them a rinse with water beforehand).
- Elastic Bands (you are going to need 5 - 6 elastic bands).
- Rubber Or Latex Gloves (you will need at least one pair of protective gloves).
(after following steps 1 - 5 of part one)
Step 1 - With this technique, there is no need to section off your fabric because we are only going to create two different shades of colour. Firstly, you are going to place your chosen objects behind your fabric, grab hold of them with the fabric and one by one, use your elastic bands to tightly secure them in place. This is going to cause your fabric to bunch up, so when the fabric is dyed, you will be left with a circular resist which creates the pattern on the fabric. Try to tie the objects randomly over the fabric, filling most of the space.

Step 2 - Next, wearing your protective gloves, you are going to bring your fabric over to your dye container and place all of the fabric in the dye, leaving it to soak for 5 seconds.
Step 3 - Now take the fabric out of the dye and dip only half of the fabric back in again, stopping when you think the dye is levelling halfway up the fabric. Leave the fabric to soak for 20 seconds this time.

- Once you have done this, you need to follow steps 6 - 7 of Part Two and you are finished!
This is what your fabric should look like! ...

I hope you enjoyed this new technique, I had lots of fun doing it and will definitely be doing plenty more!
Thanks for reading, Sam x
Handy Tips:
- I recommend doing any sort of home dying outdoors or in the garden because it can get quite messy and you dont want to risk getting dye on any furniture inside the house.
- Make sure to wear suitable clothing that you dont mind getting ruined, if the dye splashes on to your clothes it can be really hard to get out.
No comments:
Post a Comment